- by Lakyn Cooper
- 23 July 2019
In April this year Daniel Pett from the Fitzwilliam Museum in England visited the National Museum of Australia and inspired the Digital and Content Services team to investigate digital 3D models. Five team members recently participated in a photogrammetry workshop hosted by Terhi and Katrina from the Centre for Digital Humanities Research (CDHR) at the Australian National University.
The Museum previously worked with the centre in 2017 to create the 3D models of Jack Wherra’s boab nuts (below). The 3D models were used in the first Xplore exhibition, The World of Jack Wherra.
What is photogrammetry?
Before we dive into our experience, let’s talk a bit about photogrammetry.
Photogrammetry is one technique that’s used for creating digital 3D models of objects. You take hundreds of photos of an object and then a computer analyses and reconstructs the images into a 3D model with realistic textures.
These models can be used online or as part of digital interactives, or developed further to create accurate 3D printing models.
It’s a popular technique because of the realistic representation that includes delicate details and textures. It is also relatively easy to use and is cost-effective. However, it does require a significant investment of time to complete the process.
Selecting the objects
Not all objects can be scanned using photogrammetry, and there are some parameters for choosing an appropriate purpose.
We selected objects that:
- had a high contrast
- were transportable
- allowed us to view 360-degrees of the object.
Some object don’t lend themselves well to photogrammetry, so we avoided ones that:
- have mirrored, glass or shiny qualities
- are transparent
- are mostly black/dark
- have very thin aspects, such as fine leaves or string
- have crisscrossing objects, such as a tree’s branches
- have very plain and/or featureless textures
- include blinking or moving lights.
For the training exercise, the Education team graciously let us borrow five objects from the Museum’s handling collection. These included:
- mooncake mould used by Chinese immigrants during the gold rushes
- Indigenous carved emu egg
- handmade seaweed basket from Tasmania
- children’s victory medal, given to children at the end of the First World War
- Donald Duck money box from the First Bank of New South Wales.
All these objects have a connection to Defining Moments in Australian History, and all but one item was deemed suitable for photogrammetry learners.
We wanted to test the limits of this technique, so the children’s victory medal was selected as a test case for reflective objects. Typically, it’s tricky to create models of shiny objects as the computer cannot correctly distribute the placement of the images.
We discovered that it takes a long time to mask the object from its background and are continuing to work through this process. The setup of the object and the photography is so important, as it speeds up the process significantly.
The workshop
Here’s what the team got up to during the workshop.
Setting up
Setting up the objects is an important aspect of photogrammetry. Bad photos create bad renders.
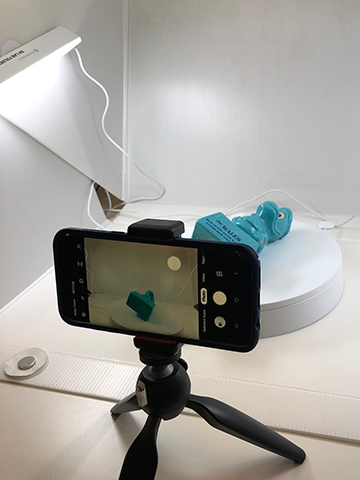
The CDHR team set up two photography systems: one using a light box, and one with studio lighting. Consistent lighting of the object is particularly important as it affects the quality of the final render. If consistent light is not possible, like when using natural light, images can be retouched in post-production, but this adds another step in the process.
Our objects were placed on a turntable. We used either an SRL camera or mobile phones with high-quality cameras. Ideally, the images shouldn’t use zoom or flash to keep them consistent.
Taking the photos
Images need to overlap by at least 60 per cent for the best results. This provides the software with enough information to line up the images correctly.
We placed the objects on a background with high contrast. This allows the software to recognise the difference between the environment and the object so that the environment can be removed later. We then rotated our objects by 10 degrees, or a thumb width, and shot each image.
The objects were photographed from all sides to capture all aspects. The moon cake mould and seaweed basket were slightly more complicated as they had recessed spaces.
Another challenge we faced was getting the children’s victory medal to stand up. We attempted to use a combination of Blu-Tac and bobby pins, but in the end careful placement of the medal’s pin, used to attach it to clothing, was sufficient.
In between each set of images, reference images were shot – usually a funny pose, face or hand of the photographer. This creates visual breaks in the list of photos on the camera that’s helpful when importing them into the system in production.
Setting up the images
Once all the images were taken, we separated them into their sets.
Usually you’d retouch the images at this stage, but due to the workshop's time restrictions we skimmed through this stage so that we could see the full process of creating a 3D model. You would usually adjust the images using software such as Photoshop to ensure consistency across the images. This reduces the chances of a patchy look when the images are stitched together.
Creating the renders
We used Metashape to create the models. We went through the following workflow:
- Import your images – each set of images was imported into what the software calls a ‘chunk’. For our objects, we ended up with two chunks.
- Align photos – software analyses the images and attempts to align them, creating a low-density point group. If your scan works as expected, you’ll start to see the shape of the object.
- Build dense cloud – this creates a high-density point group. If your images have been taken correctly, you’ll be able to see a rough shape of the object from the images that have been aligned.
- Build mesh – this is where you can select the quality of the render. The quality will depend on the output. You’ll choose a lower quality for use on the web, and high quality if accuracy is essential.
- Create texture – the textures from the images are applied to the render. This is when it will start to look more realistic and complete.
- Export – export the final files.
The team had a great time learning the basics of photogrammetry. Huge thanks to Terhi, Katrina and Nathen for teaching us the ropes. We’re grateful that we’ll continue working together in the future.
If you’d like to view more of the CDHR’s photogrammetry check out their SketchFab account.
Keep an eye on our website as we finalise the 3D models and continue to explore their application in the Museum.
You may also like