Paint your own starfish, inspired by the natural history illustrations from the exhibition The Art of Science: Baudin’s Voyagers 1800–1804.
Did you know ...
Baudin’s artists, Charles-Alexandre Lesueur and Nicolas-Martin Petit, produced works of great beauty that are part of an important scientific collection today.
Imagine a time before cameras. How would you keep a record or show someone else what you had seen?
Lesueur and Petit were some of the first Europeans to see Australian animals. They used pencils, watercolour and gouache (a thicker watercolour paint) to show their discoveries at home in France.
How to make a starfish natural history illustration
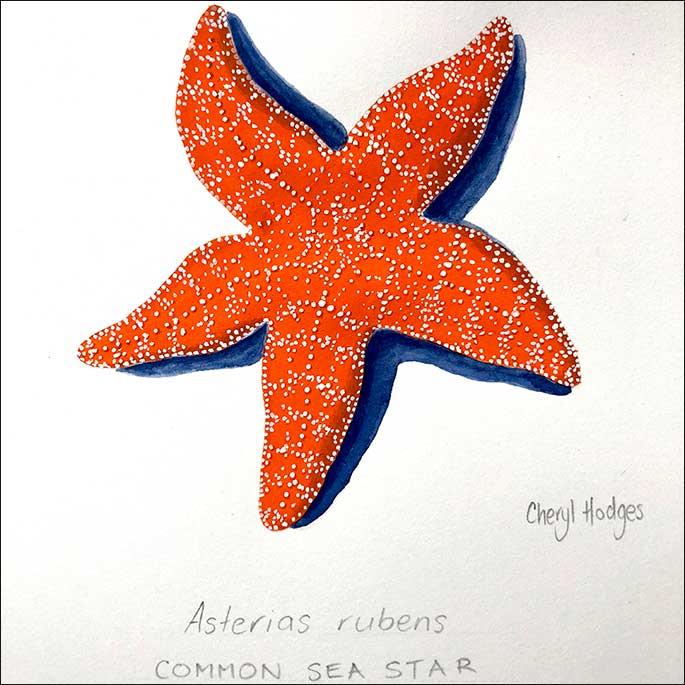
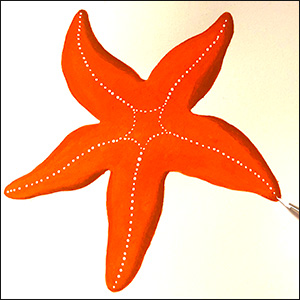
Examine the beautiful starfish artwork above, created by NatureArt Lab artist Cheryl Hodges. This common sea star is what you are going to paint. What is the starfish’s shape? Can you break it into different shapes? How many arms does it have? What colours can you see?
Skill level: ★ Easy – this might look hard, but follow the steps to create your own beautiful artwork. Use quality paper and paints for a professional finish. Ask your local art supply store if you need help.
Time: 30 minutes
What you need:
- watercolour paper, 300gsm is best and we used A5 size
- scrap paper to use as test paper for paint colours
- graphite pencil
- gouache paints in orange, blue, white
- watercolour brushes in sizes 6 and 2
- palette or plate for mixing paints
- watercolour pencils (optional) for details.
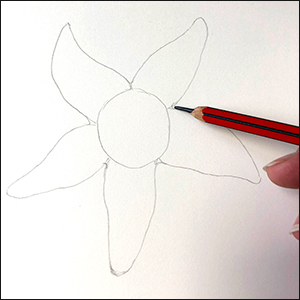
Step 1
Use your pencil to lightly sketch the shape of the starfish on your watercolour paper.
- Start with a circle in the middle then add the roughly triangular arms.
- Did you know starfish can have as many as 40 arms? We drew five.
- Don't make the arms straight. Our arms are a little curved to make them look more natural.
Step 2
- Put a small amount of orange paint on your palette and mix with a small amount of water.
- You need enough water to make the paint flow, but if you add too much, your paint will be too watery and the colour won’t look as strong.
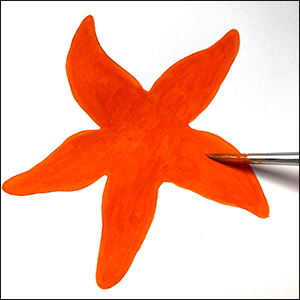
- On a separate piece of paper test the colour to see if you are happy with it.
- Use the size 6 brush to paint your starfish sketch.
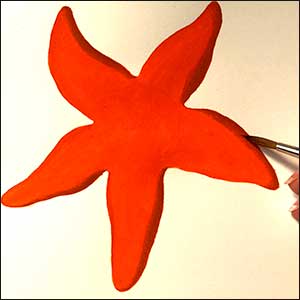
Step 3
Add some depth and shadows to your artwork so it doesn’t look too flat.
- Mix a little of your orange paint with a tiny bit of blue to make a darker orange.
- Don’t use too much blue!
- Paint this darker orange in a narrow strip, using the size 6 brush, on the right side of the arms, so it looks like a shadow.
Step 4
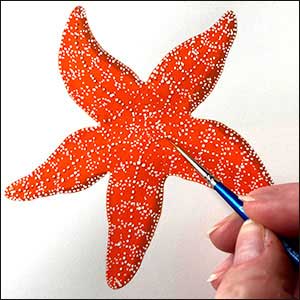
This part is fun! Add dots, and more dots, to make your starfish look more realistic.
- Mix a small amount of white paint with a tiny bit of water.
- Use a size 2, or the finest, brush to paint the dots.
- Start with a ring of dots at the centre of the starfish.
- Paint a line of dots down the centre of each arm.
- Use the fine paintbrush. Paint the dark orange on the right edge of some of the dots. Don’t paint all the way around – just one side. You don't have to do all the dots. Do it until you think it looks good.
To make the dots really pop, add a small amount of darker orange paint to the edge of some dots.
Step 5
Now we want to create the illusion that your starfish is grounded on the page. This stops it looking like it is floating. If we look at anything, there is always a light source that creates shadows. Adding a shadow under your starfish will make it look more realistic.
- Mix a tiny bit of blue paint with a little water.
- Use the size 6 brush to paint wavy lines close to the arms of the starfish.
- Look closely and you’ll see that not all sides of each arm have a shadow. The arms with no shadows show us the light is shining on them.
- Make your shadows darker closer to the arms and lighter as they move away from the edges.
Congratulations. You’re now a nature artist! Artists sign their work and sometimes add a date. You could also add the name common sea star, or the scientific name, Asterias rubens.
Now you’ve created your starfish natural history illustration, think about what else can you paint using the same techniques?
Look in your backyard, at the park, river or beach to see what other natural objects are around. Take a photo of a leaf, shell, flower or bird and try painting it when you return home.
Share your creation
We’d love to see your creation by emailing us a photo to: programs@nma.gov.au