Create a time-travelling robot. Would you like to travel back in time? Who would you like to meet? What event in history would you like to see?
How to make a robot
Skill level: ★ Easy – you may need an adult to help
Time: 30 minutes
What you need:
Our robots have a metal industrial look, but you can use anything in the home to make your robot. If you do not have the items listed here, create something different with what you have.
- metal containers like soup tins, or foam (we used some old packaging found in boxes that stored TV monitors) make great robot bodies
- electronic equipment such as old keyboards, electrical wires or gaming equipment (remember to ask an adult for help before pulling these items apart)
- metal bolts, nuts, washers, wire, and foil
- decorative materials such as paper, cardboard, tinsel, and crayons
- bottle top lids, jar lids, corks, and toilet-paper rolls
- small plastic, foam or cardboard boxes, or takeaway containers
- electrical or duct tape
- strong glue, if available (remember to ask an adult for help before using)
- scissors (remember that these can be sharp, so ask an adult for help)
- POWER UP: with the help of an adult you may like to make some movable or electronic parts, add battery power or use magnets (you can buy magnetic tape at craft stores and cut to size).
Tip: If you use materials from around the home, make sure you ask an adult first if it is okay to use them. You might need to get help from an adult cutting and constructing your robot.
Steps 1–2
- Gather your materials together.
- Plan your robot:
- How will your robot time travel?
- Will it have buttons or moving parts?
- What size will your robot be?
- Will it be all metal or a colourful mix of materials?
Steps 3–4
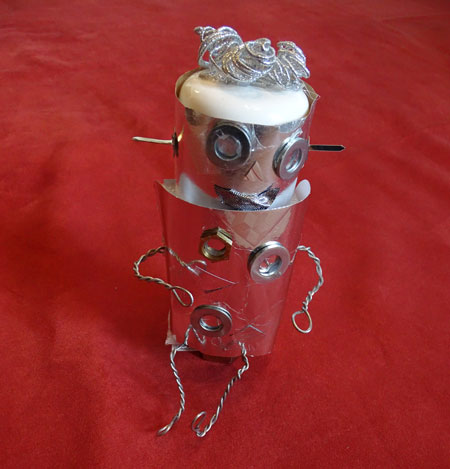
- Construct your robot. Experiment with different materials and the positioning of these items. For our robot the body was made from foam, which we wrapped in metallic paper.
- Thin wire was used to create the arms and legs, poking them into the foam to keep them in place. By using the thin wire, we could move the limbs into different positions as desired.
Steps 5–6
- Create a face for your robot, and decorate it with things like metal bolts, washers, magic buttons, stickers and metallic cord for the hair.
- If you have more time you may like to make a few different robots and experiment with the materials you use. Or you might make a time machine, as shown in the image above.
Share your creation
We’d love to see your creation by emailing us a photo to: programs@nma.gov.au
This activity was inspired by Kspace, an interactive adventure game for children at the National Museum of Australia from 2015 to 2023.