Make your own island headdress inspired by the exhibition Lag | Meta | Aus.
Did you know ...
Torres Strait Islander people tell stories about their traditions and daily life through dance and costume.
Some Islander headdresses are quite detailed sculptures. They are made from natural and man-made objects.
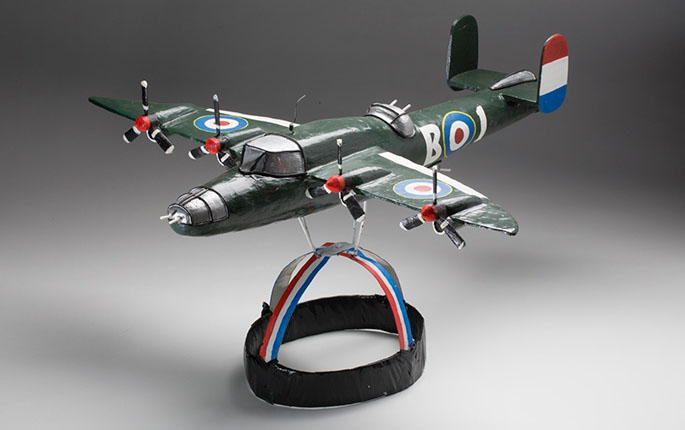
The exhibition featured the British carrier plane headdress pictured.
How to make an island headdress
Skill level: ★ Easy
Time: 30 minutes
What you need:
- two long strips of cardboard (about 4 cm x 60 cm)
- a small paper plate (about 15 cm in diameter is ideal)
- stapler and scissors
- sticky tape, string or glue to help attach things to your headdress. If you have a hot glue gun at home, this works really well to attach things, but you will need an adult to operate as it can burn your fingers
- decorative materials such as foam, feathers, fabric, shells, pegs, hoses, plastic, cellophane, paddle pop sticks or netting. In fact, you can use anything crafty that might be around.
Tips: If you are using objects around the home, make sure you ask an adult first.
You might need help from an adult with cutting, gluing (especially if you are using hot glue) or tying string to attach things to your headdress.
This activity is good to do with a friend, as you can help each other fit the cardboard straps to your head.
Steps 1–2
- Take one of your long strips of cardboard and measure it around your head, just above your ears, to make your hatband. When you have the right size, hold the cardboard in place, take it off your head and staple it in place. Cut off excess cardboard.
- Think about what it might be like to live on a tropical island. What could you put on your headdress? Lay out your materials and have a think about how you might use them.
Steps 3–4
- Cut the second strip of cardboard in half, so you have two 30cm long strips. These will cross over the top of your head and attach to the hatband. Try it on your head and if the strips are too long, cut off or fold under any excess cardboard. Staple into place.
- Attach the paper plate to the top of your cross bands with a stapler. This is now the base of your headdress.
Step 5–6
- Decorate your headdress using the materials you have gathered. Use tape, glue or string or a combination of these to attach things to the plate. You could use paddle pop sticks to help support things to stand up and stay in place.
- We used cardboard, paddle pop sticks and feathers to make a boat, a green foam tree supported by paddle pop sticks, and a wooden peg person dressed in fabric.
- We also added shells and made a jellyfish (can you see them?)
You can now wear your headdress. Can you and your friend make up a dance to tell your island story?
Share your creation
We’d love to see your creation by emailing us a photo to: programs@nma.gov.au