Make a crown or shield like the ones seen in the Lewis chessmen, previously on show in A History of the World in 100 Objects from the British Museum.
Did you know ...
The Lewis chessmen were found sometime before 1831 on the Isle of Lewis in Scotland. It is believed they were made in Norway in the 12th century.
How to make a medieval crown
The king and queen in the Lewis chessmen wear crowns. Think about what makes a crown precious. Would you have liked to rule in medieval times?
Skill level: ★ Easy – you may need an adult to help
Time: 30 minutes
What you need:
- cardboard, coloured or metallic card or paper
- crayons, textas, pencils or paint
- decorations such as stickers, glitter, cellophane, felt or silk
- scissors (remember, these can be sharp, so ask an adult for help)
- measuring tape or string
- tape or stapler and staples
- glue.
Steps 1–2
- Gather your materials. Cardboard makes a strong and flexible base or you could try coloured paper. Experiment with different materials.
- Measure your head with a piece of string or measuring tape. You can ask a friend or family member to help. Mark the length of your crown on the card.
Steps 3–4
- Draw the outline of your crown onto the card, after deciding how wide it will be. Cut your design out with scissors, asking for help if you need it.
- Decorate your crown, remembering that crowns are special! You may like to start by painting your crown or covering it in metallic paper. We used stickers for precious jewels, drew on pearls and stuck coloured paper around the base.
Step 5
- Once your crown is decorated (and dry if you used paint), bend the two ends towards each other and tape or staple together. Try on your crown and check it out in a mirror.
How to make a medieval shield
You might like to make a medieval shield to match your crown!
Did you know ...
The knight in the Lewis chessmen holds a shield. Shields in medieval times often included symbolic coats of arms or showed loyalty to a family, king or duke.
What will the decorations on your shield say about you? How will the shield shape protect your body?
Skill level: ★ Easy – you may need an adult to help
Time: 30 minutes
What you need:
- thick cardboard (old boxes are great)
- coloured paper and card
- crayons, textas, pencils or paint
- tape and glue
- scissors (remember, these can be sharp, so ask an adult for help).
Tip: Find out more about medieval shields. How were shields used? What shape will your shield be? Think about decorations, colours, and what you want your shield to symbolise.
Steps 1–2
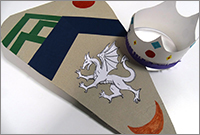
- Gather your materials. Draw an outline of the shield on the cardboard. Our shields are kite shaped, like the ones from the Lewis chessmen. Using scissors, cut out your shield.
- Decorate your shield. Many were divided into sections. We divided ours with strips of blue paper glued to the front.
Steps 3–4
- Draw onto paper any other symbols you want to add, then cut them out and glue onto your shield. We chose a dragon. You could find out what dragons or other animals symbolise in different parts of the world. We also added green mountains made of tape to show the landscape where we live
- You can also draw emblems or symbols directly onto your shield. We used textas to add a red circle and orange crescent. You could represent your family with a coat of arms.
Step 5
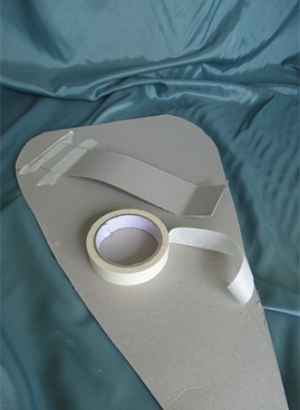
- Once you have decorated your shield, turn it over and add a handle. Cut a thick strip from your original piece of cardboard. Tape it to the back of the shield, leaving room for your hand or arm.
Test your shield!
Share your creation
We’d love to see your creation by emailing us a photo to: programs@nma.gov.au